
Appearance
Running a Live Event or Conference
A multi-session conference is the most involved thing you can build in LecturePanda, and almost all of it comes down to one course carrying several credits. This guide covers the shape of that setup, what attendees are sent and what they do afterwards, and the two configuration mistakes that account for most conference support tickets.
"Module" for you, "part" for learners
Where this page describes what an attendee sees, it says part — that is the learner's word for one of your modules. See Course Modules.
One course, many credits
For a conference, build a single course and add one credit per session.
Attendees register once, then choose the sessions they actually attended. Each credit carries its own session times, its own claim code, its own quiz or evaluation, and its own certificate template — so a nursing session and a pharmacy session on the same day can report to different places and hand out different certificates.
Give every credit its Session Start and End Times and LecturePanda assembles the agenda from them automatically.
Sessions in different rooms, on different days, or online
In the new course builder, a session that needs its own venue or its own dates can be a module of the course: each module carries its own start and end and, when Live, its own address, room, conference line and webinar (a Same as previous module button copies the place from the one before). The announcement page then lists the modules under Components, groups the agenda by component, and offers an Add to calendar link for each; the course's own dates and venue on your lists and reports are worked out from the modules. Each module also takes its own check-in and sends its own emails — see below, and Course Modules.
Credits or modules?
Both are right; they solve different problems.
- One module, many credits suits a conference in one place over one stretch of time. Attendees tick the sessions they went to from a single credit list.
- A module per day or per session suits sessions with their own date, venue, webinar or door check-in. Each module has its own credit list, its own evaluations and its own certificates, and an attendee finishes Friday's part without waiting for Saturday's.
You can mix them: a module per day, each holding that day's session credits.
Recurring and multi-session events
A class you run repeatedly — twice a month at the same venue, say — should be a separate course for each date. Duplicate it to save time.
The reason is registration, not email timing: a learner can't register twice for the same course, so someone who attended in March couldn't sign up again in September. Separate courses also give you one registrant list per date, a seat limit per date, and an announcement page that shows one date instead of a range that is half in the past.
A program of different sessions for the same group — a six-week series, a two-day conference — is the opposite case: build one course with a module per session. Each live module sends its own day-before and starting-soon emails and starts its own reminders when it ends, so nothing fires at the wrong time. See Structuring a Course for the full comparison.
What attendees are sent
For each live module, every active registrant gets:
| When | Join link? | |
|---|---|---|
| On registration | Confirmation, with the date and place (or a What's included list of every part) and one button to their course page | No — by design. It says the join link arrives before the session. |
| About a day before the module starts | Tomorrow: {part} ({course}) | No |
| About an hour before | Starting Soon: {part} ({course}) | Join The Webinar, when the learner has a link |
| Weekly after the module ends | Reminder to finish, until they complete | — |
Things that catch organizers out:
- Attendees of a three-session course get three pairs of event emails, one pair per session. That is intended.
- A webinar connected through Zoom or GoToMeeting gives each attendee a personal join link when they start that part. On a course with several modules, an attendee who hasn't pressed Start This Part has no link yet, so their starting-soon email has no join button and says "Your join link for this session is on your course page." A Webinar Link typed into the module by hand always appears.
- Audience polling is reached from the course page. Attendees press Interactive Questions on their course page during the session; there is no polling button in the email any more.
- Anyone who has already completed the part is skipped, as is any part that is locked or closed.
- Move a module's start time and both emails go out again for the new time.
The full detail, including how to reword the button, is in Emails LecturePanda Sends.
Session times: back-to-back is fine, overlapping is not
Session times are inclusive at the start, exclusive at the end. A 10:00–11:00 session and an 11:00–12:00 session don't overlap, so enter them exactly like that — there's no need to end the first at 10:59.
Credits whose times genuinely overlap can't both be claimed. That's deliberate: nobody attends two concurrent sessions. But it's also the single most common cause of a conference behaving strangely, and it rarely gets reported as a scheduling problem. It shows up as:
- "The course won't let attendees submit more than one UAN."
- "Only one credit shows up for attendees — the second one is locked."
- "It worked for our other seminars, so we had to build a separate course per UAN this time."
Multiple credits on one course is the supported pattern, so if you find yourself splitting a conference into one course per session, check the session times on the credits first. Even a few minutes of accidental overlap locks the second credit. It takes about a minute to spot.
If a credit is still unclaimable after you've ruled out overlaps, check whether it's restricted to a registration type the learner didn't register under, or whether something is listed in its Locked When Any Of These Credits Are Selected field — that setting creates a manual conflict on top of the automatic time-based one.
Verifying attendance
Live attendance can't be tracked the way video progress can, so claim codes stand in for it. Set Credit Security on each credit — see Credits for the field itself:
- Single Code — one code for the session, which the speaker or moderator reads out. The usual choice.
- Double Code — two codes, one released at the start of the session and one at the end. Attendees enter both. This is the digital equivalent of a sign-in/sign-out sheet, and it's what to use when your accreditor requires proof of full attendance.
- Multiple Codes — a unique code per attendee, for when codes are handed out individually.
Scanning people in at the door
Separately from claim codes, check-in puts a barcode in each attendee's emails, which staff scan as people arrive.
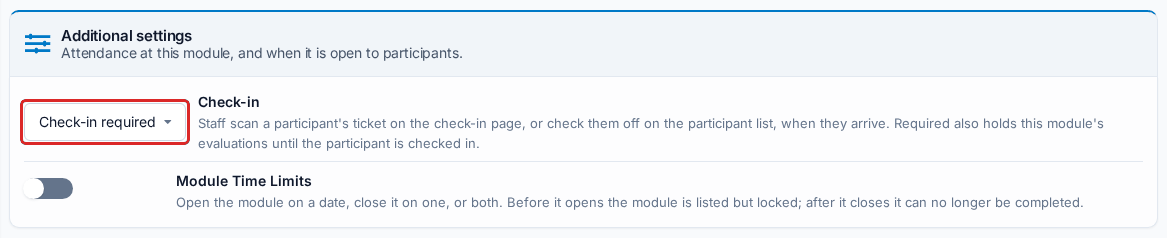
Course builder — check-in is per module. Open the module's settings page and set the Check-in dropdown to Check-in optional or Check-in required. Required also holds that module's evaluations until the participant is checked in — useful when the venue door is your verification point rather than the session room. A two-day conference can take attendance on both days, or only at the workshop that needs it.
- The scanning page is Tools & Reports › Ticket Scanning. When any module takes attendance it shows a Checking in to dropdown listing every module that does — pick the one you're standing at the door of before you start scanning. Every module scans the same way; a course with one such module has it picked already.
- On Tools & Reports › Registrant List, each person's row gains one check-in toggle per module that takes attendance, and shows a "{module} check-in:" time once they're in. The registrant export gains a matching "{module} check-in" column per module.
- The barcode is in the confirmation when any module takes attendance, and in a module's day-before and starting-soon emails when that module does.
Checking someone in starts that part for them
If a walk-up hasn't pressed Start This Part yet, scanning or ticking them into a module starts it on their behalf. That is what you want at the door — but a started module counts towards your participant bank like any other (the learner's first is included; each further one uses a participant). See How Billing Works.
Classic pages: set Select Check-in Process on the course's Details tab, and scan on the Check-In Page. On a course with modules, that setting and that scan are the first module's (first in the Course Outline order).

What attendees do afterwards
Once the event is over, an attendee's path is:
- Register — usually before the event. This consumes one participant from your bank.
- Open any of their emails and click the button, which signs them in to their course page with no password.
- On a course with several modules, pick the part. The course page opens on a Parts list. They press Start This Part (later Open This Part) on the session they attended. The join button and Interactive Questions for a live part are here too. A course with one module skips this step.
- Select the sessions they attended from the credit list.
- Enter the claim code for each session.
- Complete the quizzes and evaluations attached to those credits, plus any overall event survey.
- Download a certificate for each session successfully claimed.
Steps 4–6 loop over every session, so an attendee typically claims several credits from one registration. On a course with several modules, steps 3–7 repeat for each part, and each part hands over its certificates as soon as it is finished.
Completion is locked until the event date
Attendees can register and start early, but the final submit step stays locked until the event's date arrives — by design, since nobody has attended yet. On a course with several modules the lock is per module: each part unlocks on its own event date, so Friday's part can be submitted on Friday while Saturday's stays locked.
This surprises admins rehearsing before launch: the flow appears broken at the last step. It isn't. Note that the test registration still consumed a participant, even though the claim couldn't be finished.
The claim gate is worth designing for. An overall event survey should be set to Everyone, but every session evaluation must be attached to its credit — a session quiz left on Everyone forces the whole audience to complete it and blocks their submission. See Quizzes & Evaluations, which is the most common conference misconfiguration after overlapping times.
Capacity
A seat limit caps registrations — Seat limit in the course builder under Registration › Security, Restrict Seat Count on the classic pages' Registration Security tab — and you can raise, lower or remove the cap at any time. Two ways that helps:
- Hold the room back. Register your speakers and VIPs while the count is low, then raise it when public registration opens.
- Expand mid-sale if you move to a bigger venue.
The cap is on the course, not on a module: it limits how many people can register, not how many can start a particular session.
There's no automatic waitlist today. If you sell out and someone cancels, raise the seat count manually to let the next person in.
Time zones
Enter session times in the time zone where the event is being held. Learners see them converted to their own local time automatically, so a 2:00 PM Central session reads as 3:00 PM to someone in Eastern time.
You don't need to list multiple time zones on the course — though it's still worth naming the primary one in marketing material that lives outside LecturePanda.
Offering the recordings afterwards
When you want to sell the recordings on demand after a live event, duplicate the course and run the on-demand version separately. Don't add recordings to the live course.
The live course is built around assumptions that don't fit on-demand learners:
- Claim codes were released in the room. There's no sensible way to give recording-watchers a code on the same credit.
- Video tracking is normally off for live events, so there's no completion gate for someone watching a recording — and switching it on afterwards disrupts people who already claimed.
- Event messaging on a single-module course would go to on-demand learners as if they were attending live.
- Your reporting gets muddled, with two cohorts under one registration list and one set of completion stats.
On the duplicate, drop the code requirement from the credits and turn on the video tracking requirement instead — watching the recording becomes the verification step.
What about a recording module on the same course?
In the course builder you can add a Home module holding the recordings. It sends no event emails, and it has its own credits, so the claim-code problem goes away. That works well when the recordings are for the people who already registered — attendees catching a session they missed. For a new on-demand audience the duplicate is still the better choice: different price, registration that stays open after the event, and a live registrant list that remains a clean attendance record. Bank cost is equal: a second module started and a second registration each use one participant.
The trade-off is real: an attendee who wants both live credit and the recordings is two registrations, so two participants from your bank. It's usually still the cheaper option once you count the support time that a hybrid course generates.
Related
- Structuring a Course — modules, separate courses, or a catalog
- Emails LecturePanda Sends — every email an attendee receives
- Course Modules — building a module per session
- Quizzes & Evaluations — evaluations per session versus an overall event survey
- Managing Registrations — the registrant list, resending access, no-shows
- Conferences & Certificate Programs — ACPE's rules on UANs for multi-session events